
Dear Chicago House,
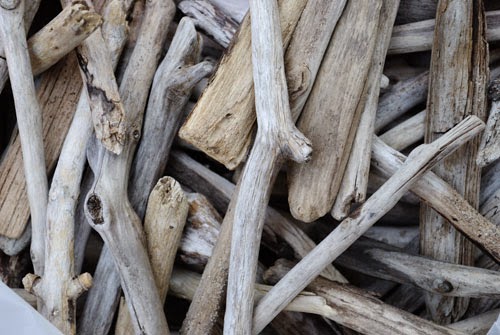
Mr. Chicago house and I had a little wander down to our favorite secret beach last week and collected a lovely bundle of drift wood.
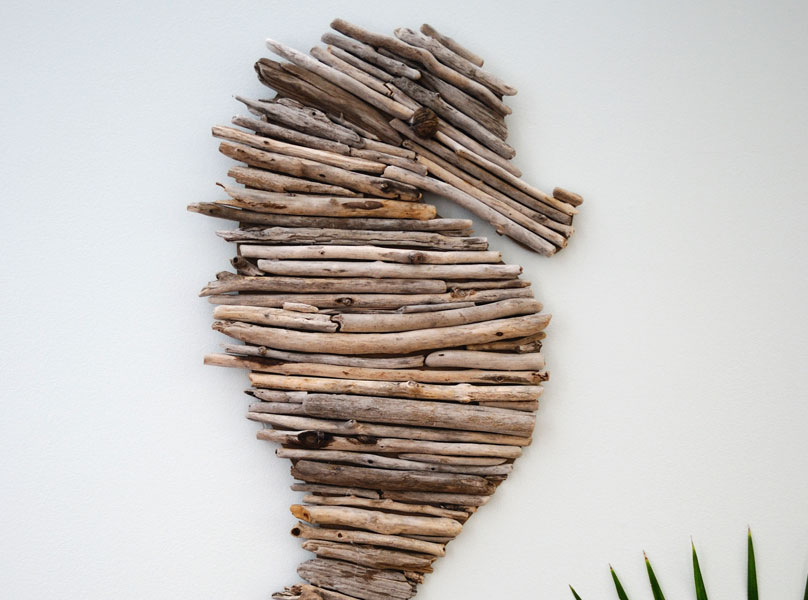
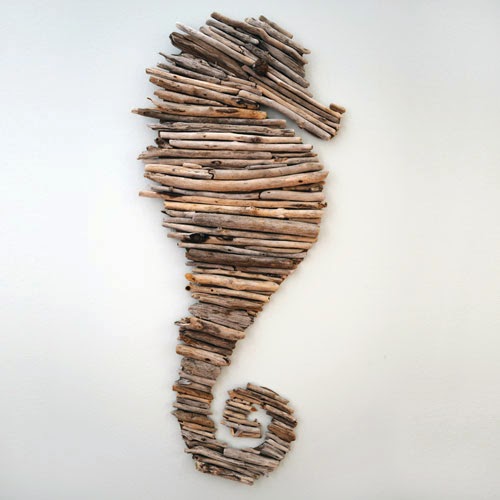
With a bit of creative magic I used it to whip up Seahorse!

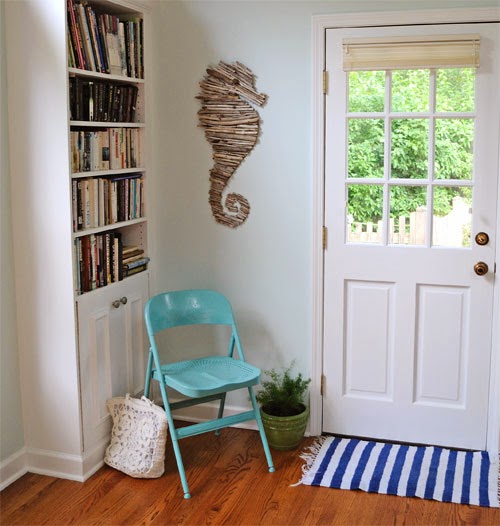
isn’t she lovely…I have called her Sally, at the moment she is gracing a wall in my office.
Would you like to know how to make one…read on
How to make a Driftwood Seahorse
What you will need:
- Pieces of straightish driftwood, I had about a shopping bag full and had lots left over
- Stiff Cardboard
- Pencil
- Ultility Knife
- Hot glue gun
- Sketch your starfish shape on your cardboard, mine is about 36″ by 16″. I copied the shape from an abstract watercolor of seahorses
- Cut out your shape using a utility knife. You can see from this picture I taped two peices of cardbord together to get the height I wanted.

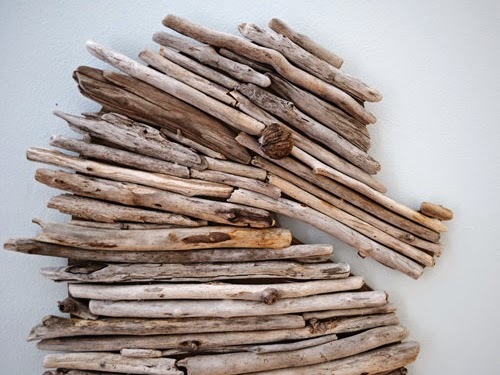
- Sort through your driftwood and start laying it over your cardboard, this process is really trial and error. I tried to keep the placement tight over the seahorse’s belly but was quite happy to have a more ragged look over the back. I kept the driftwood pieces mostly parallel.
- Once you are happy with your choice and placement of the driftwood, fire up your hot glue gun and start sticking everything down. I started at the tail and worked up.
- For the eye I used a driftwood walnut (Mr Chicago house can take credit for that!)

Love from
Creative in Chicago
XX
p.s. Sally the driftwood seahorse was featured on an episode of Unlivable on the FYI network >> read more
excellent ! keep on from greece xxx
me ha encatado , esta regio,gracias.
Exactly the idea I was looking for, for my newly collected driftwood pieces. Adorable!
Incredible. I love it!
Wow, that is incredible. I love it. I want one for myself.
Exactly the idea I was looking for for my newly collected driftwood pieces. Adorable!
Love drift wood…love seahorses…just like the commercial for Reese's peanut butter cups.
How did you attach it to the wall? But overall simply beautiful
Really neat idea if you can spend time walking the beaches, especially after a storm. Thanks for sharing.
So cute! Pinning this now 🙂
I love this so much! I grew up on Long Island surrounded by beaches and never found a haul of driftwood!
Wow, that's so cute!
Absolutely love this!!!! Pinning it!
This is fantastic! I'm looking forward to our winter storms that bring in lots of driftwood, so I can try it 🙂
Wow this is amazing and so very clever. Love it. Thanks for sharing.
WOW! WOW! WOW! I can't wait to go and find some driftwood, this is truly inspirational, and would look TERRIFIC on my new bathroom wall!
Love it!
Judi in the UK
This will look brilliant in the courtyard of the beach house villa at mooloolaba qld. I have some marine ply let over from another project to attach it to. Beautiful!
Do you sell these?
Wonderful idea !
I really like this handcrafted
This is so pretty. I love it! I featured it on my weekender.
http://aweekfromthursday.com/2014/05/weekender-5232014/
Thanks for sharing!
I love this – but have a question: How did you hang it on the wall?
I threaded some thin string onto a fat needle and stabbed it through the cardboard and created a loop. Hope that helps ans glad to hear your liked the seahorse!
I love driftwood and love Seahorse.Good idea! Kiss from Serbia,
Cale
that is a great idea!
I love this idea! I would love it if you joined and contribute your awesome posts at my link party at City of Creative Dreams, starts on Fridays 😀 Hope to see you there at City of Creative Dreams Link Party.
This is such a creative project. Love the soft look of driftwood and finding new ways to use it. Your seahorse is so sweet.
Thanks for sharing,
Suzanne
Pieced Pastimes
What do you put on the wood to preserve?
Nothing, the driftwood is very dry and not really prone to rotting. If I hung it up outside it may be a different story!
OOH, this would look great in a beach cottage! What a great idea…enjoy a walk on the beach picking up driftwood then use it to make something beautiful for your home! And we can follow the same idea you laid out for so many designs, like sand dollars, starfish, fish, etc! Thanks for sharing!
-Amelia http://www.atlanticrealty-nc.com/blog
Thanks for your kind words Amelia ..funny as I have just made a pair of driftwood fish!
https://vco.lkt.temporary.site/2014/11/driftwood-fish-tutorial.html
No…maybe I should!
https://vco.lkt.temporary.site/2014/11/driftwood-fish-tutorial.html
Love this! I'm working on one now. Just curious…what did you attach on the back to hang it and how?
I threaded some thin string onto a fat needle and stabbed it through the cardboard and created a loop. Hope that helps ans glad to hear your liked the seahorse!
Can I say how much I love this. Couple of questions, how thick is your cardboard? I know that it has to be thicker than what it seems. Also, what is the height of it? Finally, would you just sell that one to me, I have no talent, no skills. lol!!!!
Thanks
Erin
Hi Erin ,
The cardboard I used is very stiff, I am not sure how thick it is. I got it from the back of a large sketch pad. The height is about 30".
Thanks Zoe. I really want to do it, but, scared.
We loved your inspiring idea so much that we posted your link on our blog. http://miniowls.com/1/post/2015/09/what-do-you-do-with-your-summer-treasures.html
Thank you
I want soooooo much to make this seahorse, however, I live in an area that is far from the beach. Does anyone have an abundant supply, that they would care to donate, or sell?? I'd rather not purchase on ebay. Any replies will be very much appreciated.
Thank you
Sherry
Hi Sherry,
Glad I have inspired you to make a sea horse. You could always try making it out of twigs gathered from a woodland area or even a park…to make them look like drift wood you could try bleaching them first. Send me a picture once you make it and I will stick it up in a new blog post
Zoe
A great collection..thanks for sharing my seahorse
I just made this. It turned out pretty well! 🙂
I'd love to see it!
Hi Zali, Thanks for sending along a photo of your seahorse…it's lovely!
I so want to make this!
That is just brilliant! Exactly what I want and. Instead of buying one, I am going to try making it! Thanks for sharing 🙂
Send me a photo of your masterpiece!
ohhh love this…I’m thinking I’ll do a five point star on black canvas (prestretched), should look a treat.
I came across this a few months ago and have been dying to try it. I had to make driftwood since our nearby beaches are pretty empty, but I found a great tutorial online and Hurricane Matthew provided me with a lot of branches. I soaked them, bleached them, and now I’m just waiting for them to dry. Hopefully I will have time this weekend to create a “Sally” of my own. With your instructions I’m hoping it turns out as great as yours did!
Send me a photo of your Sally!
Love it!! I am in the process of making a turtle and it is slow going! Think I need to get back to it!
I’d love to see it Nancy
I really want to make one but are having a hard time finding a stensil that will print out big enough. I cant draw 🙁 help! 🙂
try printing out a simple seahorse shape and drawing a grid over it to help you draw a larger version.