
Dear Chicago House,
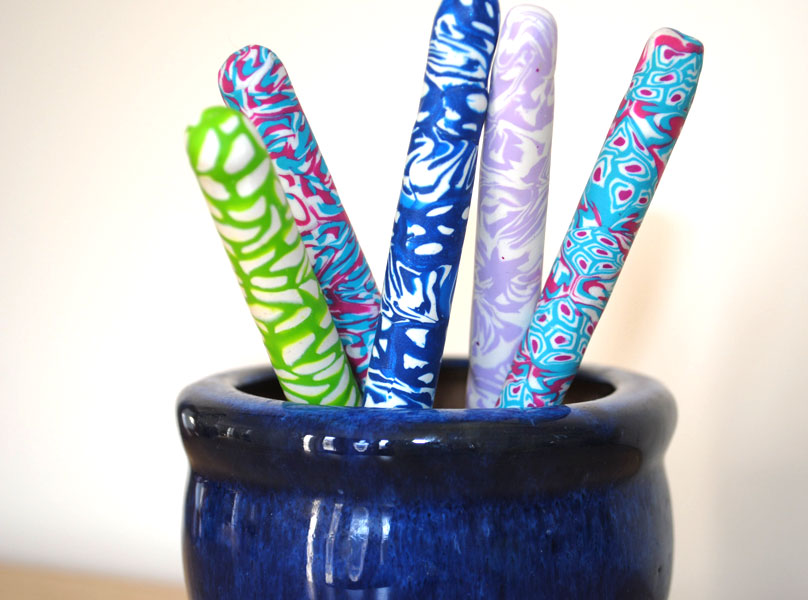
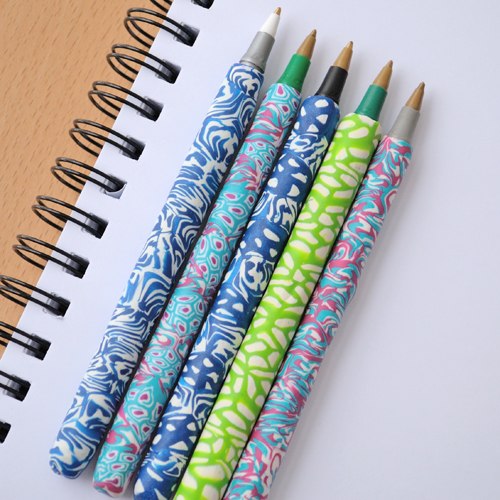
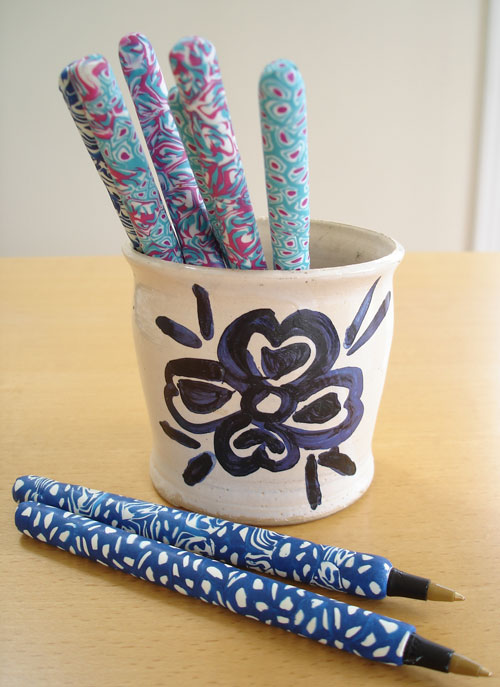
Remember these lovely colorful pens that added a pop of color to my desk I shared with you earlier this week.
Well here is a little “how to” on how to make them.
You will need
- A couple of blocks of oven bake polymer clay
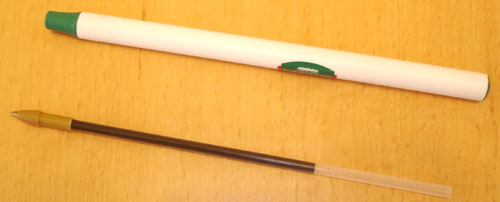
- A cheap bic type pen, the sort you can pull the ink cartridge from
- A rolling pin
- A sharp knife

Here is what you do.
Using half of the clay from each packet, soften it and one roll one piece flat and form the other into a sausage.

Trim the flat piece into a rectangle

Wrap the flat piece around the sausage and cut of excess sausage ends.

On a flat surface start rolling until your new sausage is about 12″ long

Then cut it into 6 or 7 equal lengths.

And stack them together like this

Now roll out again to make a a sausage of about 12″ again.

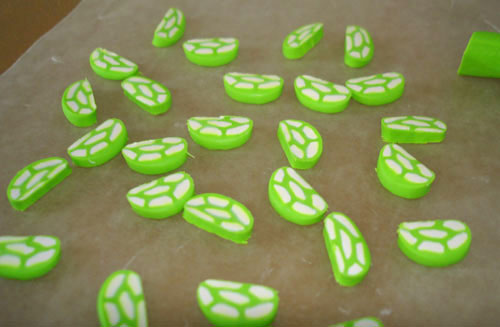
Take your knife and slice off the end … sweet!

Cut the thin slices of the sausage to make tiles. You will need about 30 and will have a lot of sausage left. Store it in air tight container and it will stay soft for your next creation.
Now remove the ink from your pen.
And start sticking on your clay tiles in a brick pattern fashion. Don’t worry about spaces.

Once you have your pen covered roll it on a flat surface, hey presto all the spaces disappear.

To harden the clay bake in a 275 deg F ( 130 deg C) oven for about 15 minutes. When cool you can put back your ink.

Aren’t they they fun. There are all sorts of techniques you can use to make different tile designs. I will share those another day. ( at last got around to sharing the marble technique HERE)
Love from
Creative in Chicago
XXX
I do have a few more techniques. I will post them soon. Thanks for stopping by and commenting
These are beautiful! Do you have any other techniques to share??
How did you make the pens that look marbelized?
Great tutorial. I knew this could be done but I didn't know how. Thanks! Saw you at Shabby Chic Cottage.
Oh I love this!! So creative!
Can you bake the clay so it is hard??? If so what are the instructions for that? 🙂
Thanks
KD
Read the baking instructions on clay pkg. It is according to what brand of polymer clay you are using.
This is great! Looking forward to seeing your additional designs! The teens I work with are going to love making these!
I tried this and they turned out great! I can't wait to see the tutorial for the other designs…
Those are wonderful 🙂 I'm just starting with polymer clay so any tutorials are helping me understand how to use it.
I wanted to be sure the pen wouldn't melt after reading a few other blogs and it shrunk after 1 min. Will keeping the clay on keep it from shrinking?
The instructions for the clay were great, very easy to follow. However, I used a different kind of pen, the kind with the clear plastic barrel. Let's just say it didn't work out lol! The barrel melted. So definitely use the ones specified! Other than that, which was obviously MY fault, it worked perfectly!
Was your pen see through? I’m wondering if that’s why your melted?
The type of pens I have been using for these all have solid not clear barrels … not much help I know. I am going to do a little more research and see if I can specify exactly the right pens.
Thanks so much for your comments. I am going to write a tutorial in the next week or so on how to make the marblized version
Ooooo- such a clever idea! Can't wait to try it!
Pleaaaase post the other tutorials!!! 😀
Ladies and gentlemen…there is a new tutorial on how to make the marble version of these pens HERE
I used the clear barrel pens with no problems at all. My only problem was when rolling the pen to get out the gaps it made the clay expand and become loose.
How did you fix that?
I had to squish it back down…. did you experience this problem? And how thick were the slices you did… mine I think are a little thick, and were having a hard time sticking the pen unless I squished them.
I wonder if you could wrap it in parchment or plastic wrap in the beginning, just until it starts sticking?
really not necessary!
I haven't really encountered that problem, my slices are a couple of millimeters thick but I do have to squish them a bit to get them to initially stick. I'd love to see then pens you have made!
hiii, this pens are lovely! but i have a problem, do you think i could make them with cold porcelain instead of sculplex which, in my country is reaaally expensive and hard to find, thankss for your help! great tutorial!
So pretty.
Great tutorials.
~ Dana
I did this with the pens and they turned great! Then we got the idea to do forks and knives. Like on the handle? Perfect! Thanks do much
What a great idea…I wonder how they would hold up in the dishwasher or even washing by hand. I think I will have a go at this. Send me photos and I will include them!
Those are very nice! Have you ever tried this with air-dry clay? Maybe cold porcelain or a squishy clay, that could work! That is still amazing!
Hi! I want to stat making clay pens but does papermate White Bros pen work?
I just made some, they look really good 😀
Awesome! I shared your tutorial on my website, here's the link:
http://www.lescreateliers.com/Les_Createliers/Idees_Ideas/Entries/2012/8/23_Stylos_couverts_de_pate_polymerePolymer_clay_covered_pens.html
Cheers,
Marie-Eve
merci!
C EST GENIAL JE CONNAISSAIS AVEC LES CRAYONS MAIS LA SUPERBE BIZ
Yes bake on a glass baking dish at 275 for 15 minutes
Polymer clay is non toxic
Can I put BIC atlantas pens in the oven?
OMG. i love you for this , thank you!!!!
thank you so much!!! i made some great ones and then added feathers to the top!! tried to do some fall ones……made some great leaf canes from you tube tutorial, but used solid white generic walmart pens and clay chipped off. luckily i always just make one first so i wrapped up my canes and will try again. the first time i used BIC white with the finger cushions and they came out great without cracking!! My first one warped so i cooked the next batch for 6-7 minutes and they came out great. But i am addicted now. it is however trial and error with the pens you have on hand!!
Can someone tell me how many pens you can make with about 8 oz of clay?
Doesn't a plastic pen melt in the oven?:o
How many pens can be made with what amount of clay?
I made 2 pens and had a few tiles left over. It is fun to combine tiles on different pens too
what a great idea! I'm terrible for chewing my pens, this might stop me! Thanks for sharing
Wouldn't the handle be hard after this? Wouldn't it strain the fingertips?
Actually the pens are very comfortable to use
mine cracked, any clue why??
Maybe your oven was too hot
I always wondered i you could bake the plastic pen cases! TY I love these and they look so ez maybe I just came up with Xmas gifts for next year!! TY TY TY
how has no one asked how to get the ink out!!! arg I have destroyed a dozen pens!!!
n lol
Same, my pens either melt or can't get the tip and ink out. I'm so upset!
Sorry to hear about your pen issues. With all the pens I have used the ink has come out very easily.. If you can,t get the ink out then the pen is not suitable. as for them melting I wish I could define a brand of pen that wouldn't,t melt. I use cheap opens my husband picks up from hotels…maybe the answer is to use the cheapest/crappiest pens possible!
Approximately how many ounces of clay are required to cover a pen? I'm planning the activity for a group of kids and need to know how much to buy please.
I was wondering why yo don't do the end of the pen. I have been making these and can't decide if I want to do the colored part at the end. It almost looks better the way you did it, as there is a slight dent if I go to the end.
Totally beautiful
Could we use modeling clay instead of polymer clay?
I was wondering if I could use modeling clay instead of the one you used.
I am not sue about baking modeling clay but if it can withstand the oven I 'd say go for it!
modeling clay melts in the oven, not having the same meterials and such, i asked the same thing when i first heard of polymer clay.
This is a nice thread. I make really expensive pens, but wanted to have some lower cost ones too! I will try these so my customers can have a choice. I usually charge $25 – $50 for my other pens. These can go for about $5.
I make expensive pens also, and I am learning about polyclay in order to make even more expensive pens. The design given here is very simple to create, but it is also extremely attractive. Best of all, polyclay makes it easy to use designs that would be much harder to do with any other method. Not many pen makers use polyclay. Compare top quality wood, acrylics, and resin pens with top quality polyclay pens. The polyclay pens go for 3, 4, 5 times as much.
I have experimented with pens to cover with polymer clay and have found the Bic Roundstick Pens are affordable and work very well, with no warping. Take out the ink cartridge with a pair of pliers first! In Australia, they are available at BigW.
Can this be done with air dry clay?
I don’t see why not!
I love this! Can the pen be put in the oven? I’ve always been scared of that.
Hi Veronica,
Remove the ink tube and your should be ok!
How did you make the gorgeous pink and blue?!? I LOVE it! Also – I’ll be making my first batch today and baking them.. bic pens. It’s looking like the standard recommendation is 5-10 minutes at 275 degrees. What do you commonly use and what should I put them on for baking?
For the pink, white and blue ones I made a three layer sausage tile, pink in the middle and then wrapped in white then a blue layer. I put the pens on a standard baking tray. Hope your turn out well…send me a picture and I will add it to the blog!
This is quite cute polymer clay DIY making.
I love these! Thanks for sharing! I was thinking it might be cool to add a dangle to the top…maybe charms or pom-poms, I don’t know yet. I am new to clay so can you tell me should I create the hole before baking or driling through the pen case and clay after?
Thanks!
What a fun idea! yes i would create the hole before baking. I’d love to see a photo of your creations
Help everything turned out beautifully and then I baked them the Clay cracked and the pen tube shrunk, any thoughts ??
Yikes, try lowering the oven temperature.
I was just a Sculpey class and our instructor said to lower the temp to 225, & bake for 15-20 mins. Many times the pen cover is less than 1/4″ thick & it will cook and burn. It may not melt your pen tube as often. Clear tubes are a different type of plastic & don’t have the pigment & density that the white Bic pens have.
Good advice, thanks for sharing!
my pens melted and shrunk when I baked them. I bought 2 different types of pens and it did it to both. I bought Good Bic ones. How do I stop this from happening
Unfortunately it is trial and error
I love this pen craft very much. I would like to ask if I could use air dry polymer clay, and would it work as well?
Thank you for sharing this Polymer Clay craft.
Yes I think air dried polymer would work fine!