
Dear Chicago House,
Followers on Facebook have already had a sneak peak at this fabric design project.
and now here I am to share more details and give you the ins and outs of how to do this yourself. It is very easy and a lot of fun.
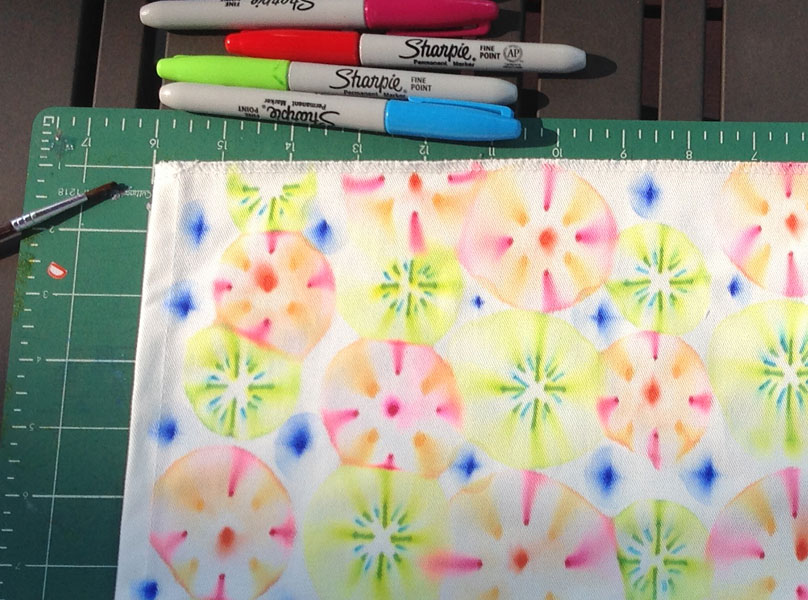
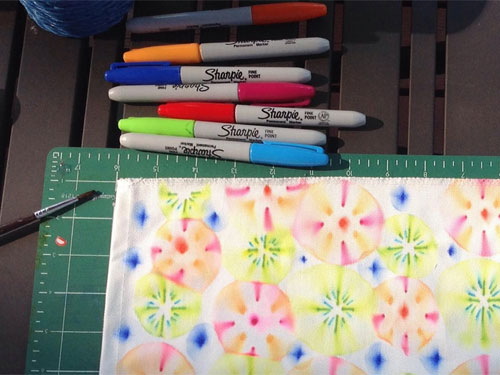
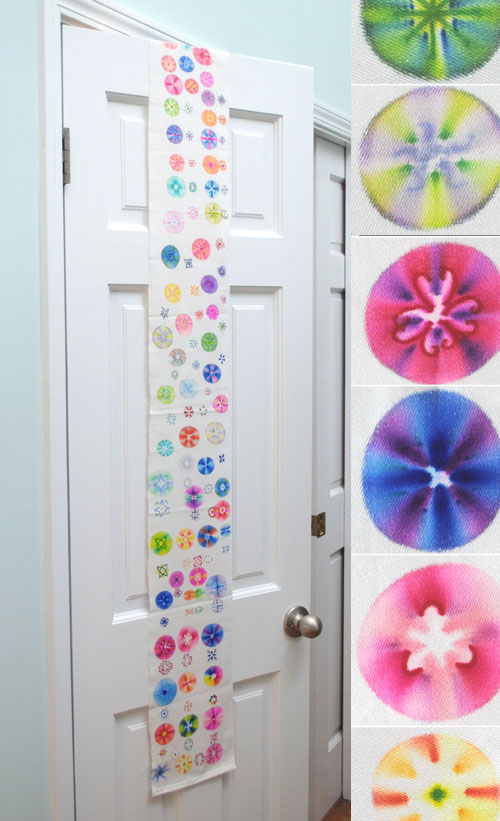
First lets just take a look at the fabric I designed.

It looks complicated and time consuming but is actually very quick and easy to do.
How to design your own fabric using sharpies
You will need
- Sharpies
- Fine paint brush
- Rubbing alcohol
- Cotton fabric
Lay your fabric out on a flat surface in a well ventilated area using something like cardboard to protect your work surface.
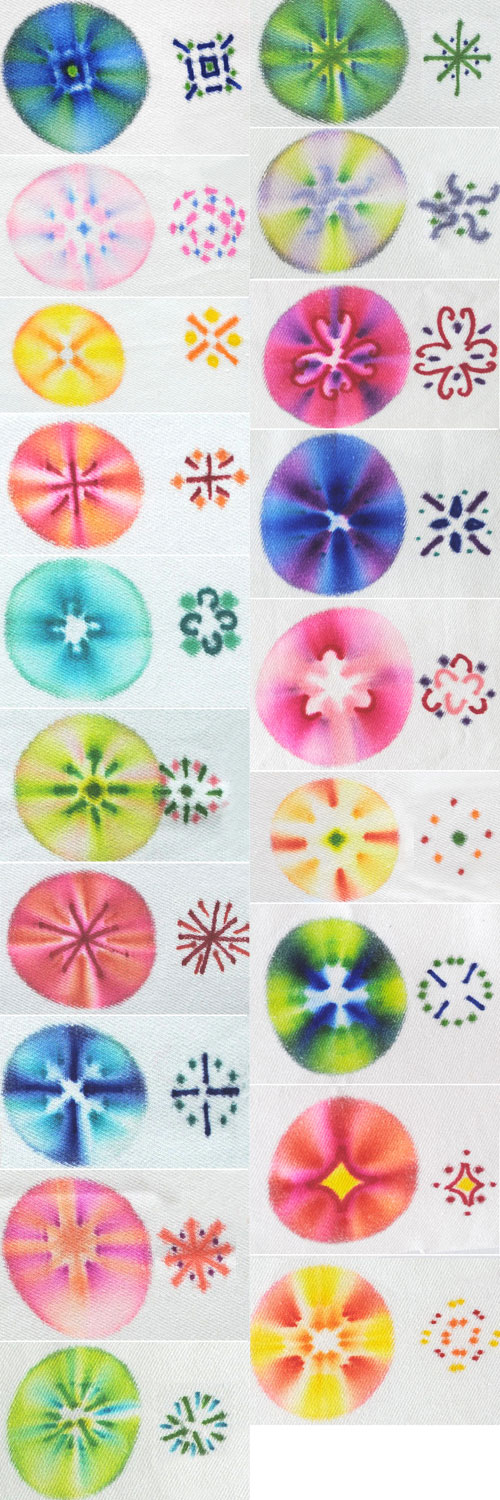
Simply sketch out a simple pattern (more on that below!). Here is the pattern I used.

Then take your paintbrush and dot a liberal amount of rubbing alcohol in the center of each pattern element
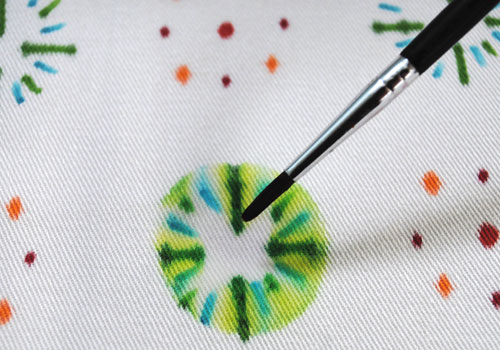
The alcohol will start to spread outwards and the colors will start to bleed and blend
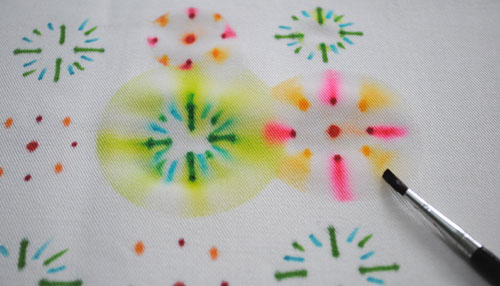
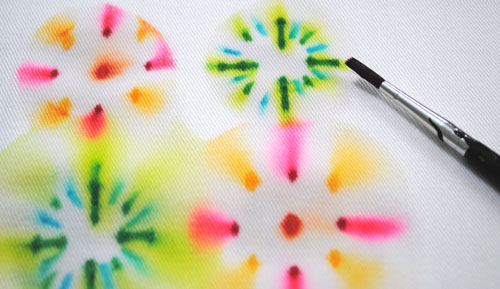
The alcohol drys very quickly and you are left with a beautiful fabric.
The design options are limitless and I went a little crazy creating test patterns but the end result is that you have a whole swatch of example to give you inspiration for your own fabrics.
A reader shared a tip for getting the color to stay put. After the alcohol has dried, iron the fabric then treat it with a color fixer – she recommended a product called retayne – you can buy it on amazon here .
I’d love to see any fabrics you make using this technique.
Love from
Creative in Chicago
XX
I like this! Do you know if it would work on silk fabric?
Hi Cathy…yes this would work well on silk too
Wow, love how they look shining like crystals! Appreciate the comparison chart too 🙂 This is beautiful!
How about on a canvas?
Except one thing.. is it ok for the washing machine.. i guess not. I mean you cannot do anything else then deco that you cannot wash, still it looks very very nice 🙂
I have not tested it in the washing machine yet but my guess is that it will be fine. Sharpie markers are waterproof so the ink should stay put. I will do a test and post the results!
Sharpie will wash out after a few times. I have used them on black jeans to “fix” accidental bleach spots and have to re-apply periodically, but it’s better then tossing a good pair of jeans. 😉
I think it would depend on the weave of the canvas. When I first tried the test patches for this project I worked on watercolor paper…except that it didn't work…the paper would not allow the alcohol to bleed enough. Might be the same issue on canvas.
I'm interested in water proofness also!
I'm interested in water proofness also!
I have done this on tshirts and it did bleed and fade quite a bit in the wash.
I have experienced BLEEDING from washing the T-shirt even AFTER I had "cured" it in the dryer 🙁 there was ink where it hadn't been before.
Iron the finished design or put the shirt in the dryer. It sets the sharpie dye, then wash it alone the first time just to make sure it doesn't run
Would this technique work on coffee filters?
Have bought the pens to give this a go – it looks wonderful! In the UK, rubbing alcohol is known as surgical spirit.
Thank you for the patterns, I'm planning a craft day for the neighborhood kids, this will help.
That is good to know, thanks:-)
Thank you, I finally understood what rubbing alcohol is (I'm Swedish)!
It doesn't work on t-shirts because they are usually a poly-cotton blend. It needs to be 100 percent natural fibre..cotton, silk and perhaps unfinished canvas, etc.
Have learned this from other craft projects.
Is it helpful to pre-wash the new t-shirt first? Do shirts still contain "sizing" that prohibits the setting as they used to?
After alcohol dries soak it in COLD white Vinegar. That should set the ink..
In the UK, rubbing alcohol is known as surgical spirit.
And in French, does someone know what is the name of "rubbing alcohol" ?
Alcool à brûler ? Alcool chirurgical ?
In french it's " Alcool a friction" – in Canada
Soda ash misted on to set.
Would this work with fabric markers?
It did not work with coffee filters. Go with fabric.
I so want to try this! To set the pen you need to heat set it. You can do it with an iron set on cotton, no steam and iron whatever fits under the iron for about 1 min. 10-15 seconds. Then move the iron and do that on the next part. You can do the dryer too just make sure you either do it alone or only with a few things. Make sure the dryer is hot enough. I was told that the dryer won’t heat it all but if it’s alone or only with a few things the whole thing should be heat set. Oh yeah, you do have to wash the sizing out of the fabric. The last thing you can try is a tub of warm water and lots of salt. I learned to do this when I bought a pair of tie dyed pants and didn’t want them to run on my dad’s undies when I washed them with our laundry. You leave it in the warm salt water for half an hour. You could leave it in longer but 1/2 hour is the least time you can leave it in for. I do rubber stamping on clothing which is how I know all of this. I can’t wait to try it on a canvas bag that I have. I will post a picture of how it looks when it’s all done.
Thanks for these top tips Gail! Looking forward to seeing your completed bag
I did this today on an old, stained shirt that I just wanted to make presentable again. First attempt went very well for me — I’m not at all artistic! I used an eyedropper to apply the alcohol and learned to pour a little in a cup after I had to fish the dropper out of the bottle of alcohol. I’d love to post a pic, but I don’t know how! 🙂
glad to hear your t-shirt turned out well. You could email a photo at z.feast@indigoimage.com!
I love this – I had an entire stack of white tees, waiting to become washrags. I used the ones that are still in good shape, and have three adorable new shirts:)They’re all hubby’s, so I cropped them. Thanks for this, I don’t have the resources to actually tie-dye, and I think these are prettier anyway!
Fabulous, I’d love to see a photo of your new shirts!
I use an eyedropper to apply the alcolhol in the center of the design. It works quite well!
great idea!
when I was younger we always used salt to fix colour, might work?
We’re doing pillow cases today. So much fun. Thanks for posting!!
oooh sounds lovely…send me some photos!
Fun to do and very pretty. We did t shirts, 100% cotton. I let ink set 24 hrs. I heat set it with hot iron. I set the ink again by treating with retayne. The colors washed out. Not entirely there is a ghost of your design left. The kids were disappointed. You need to be able to wash tshirts.
Glad you enjoyed the project but sad to hear the colors washed out. I am working on a way to make this permanent and not ghosty!
I love the idea Can you do this for desiging scarfs and what type of material would I use? I love you patterns and color choices. Thanks for the idea
A thin cotton or silk would work i think
I am going to do this with a quilting group. I want it to be successful so I experimented some. Setting the color is important. If you put a square or section of a quilt with marker , I don’t want it to fad. Thank you for new ideas in this matter.
Setting is a hot topic and from other readers it seems to depend on the fabric you use. Some ideas
I havn’t actually tried any of these but I would recommend you have a test run to see what works best for you.
Great idea for a quilt and I would love to see your results. You can submit your finished projects here
https://vco.lkt.temporary.site/submit-your-craft-diy-project