
Dear Chicago House,
What do you know, those polymer clay covered pens have been a huge hit in blog land and I did promise a more techniques on creating them. So it is about time I shared a tutorial on making a marble design, and in celebration of up coming valentines day they are in pink
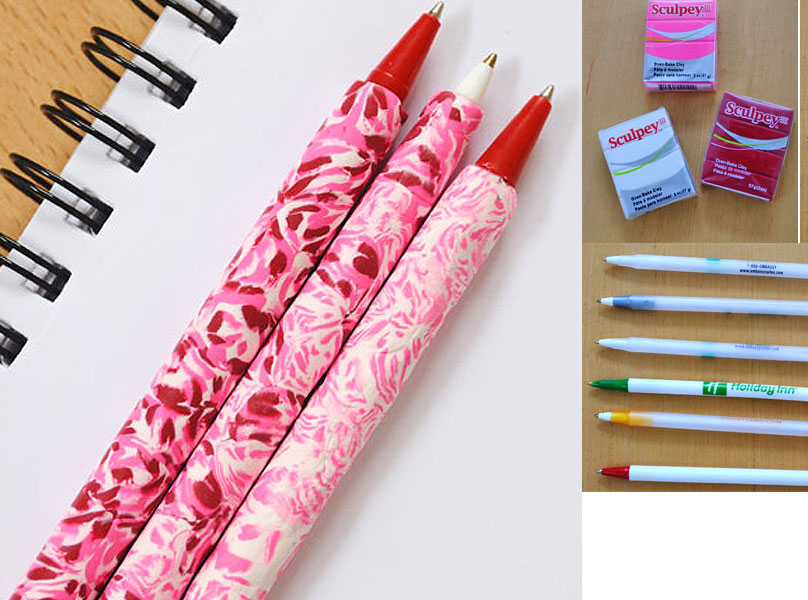
Lets kick off with the finished product.

You will need
- A few blocks of polymer clay- contrasting colors work best and I use Sculpey
- Cheap pens that the ink stick can be removed from. I generally use pens my husband picks up from hotels, the ones that solid white plastic seem to work best.

To make a Marble Pattern
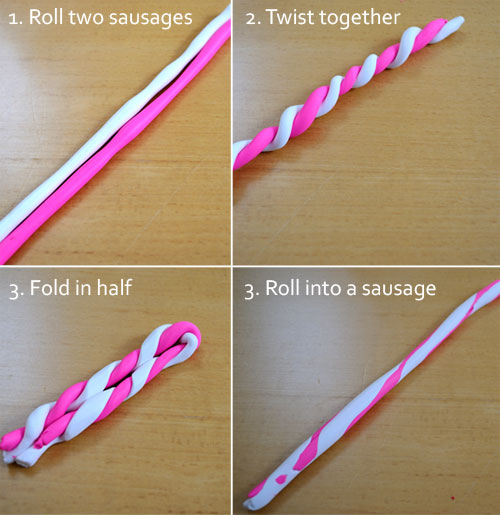
Start by softening the clay in your hands, some colors take a lot longer to soften than others. When they are nicely pliable roll into 12″ sausages, then twist together fold in half and roll this out into a 12″ sausage again. Cut sausage in half and repeat this process about 4 times.
To make the pen
Slice the sausage into thin slices, remove the ink from the pen barrel and tile the clay pieces on as show, don’t worry about gaps. Then roll the pen on a flat surface and the gaps will dissapear.

Bake according to the directions on your clay, re insert the ink and voila!
Here are some more ideas. You can use more than two colors and multiple patterns on one pen barrel.

Enjoy, I’d love to see photos of your results. Send them to me at creativeinchi@gmail.com and I will feature them!
Love from
Creative in Chicago
XX
I love working with polymer clay! Reminds me to get back to it! Maybe i'll make some of these for valentines day!
Xo,
Margo Isadora
dontmisit.blogspot.com
Hi Margo, I'd love to see any you make!
Hi Creative in Chicago, thank you for your tutorials. I’m fairly new to polymer clay but I have covered a few pens. I have learned a lot from here and you tube (all free tutorials there). I just wanted to let you know that the pens I use are the cheap Bic pens. Hope this helps. Happy Claying. Cathy.
Thanks Cathy!
Yikes!!! I’ve tried 3 and they all warped and crumbled in oven. They were the crystal bic pens. I’m going to try a solid white pen now.
Fingers crossed they work, the pens I used were those white solid ones.
i used the bic stic pens and did mine in the oven at 275* for 10 minutes good luck 🙂
What a fun idea! I'm going to have to share this with my daughter. It's right up her alley. I found you through Handy Man, Crafty Woman. Thanks for sharing! 🙂
This is an idea my teenage daughter originally brought home from an art class at school so I am sure your daughter will love this project!
ummm for some reason blogger has "eaten" some of the comments I approved on this post…sorry!
Making some of these tomorrow 😀 I love this idea!!
fantastic! just made some
wonderful…I'd love to see them, if you send me a picture I'll give you a shout out!
The one thing I would suggest is to use the classic white Bic Stic pens only. I have found that those are the only ones that don't melt in the oven. Otherwise, I love using and making stuff with the polymer clay! Great ideas!
I had the clear pens lose shape and I couldn’t get the ink back in the opening shrunk or compressed from the heat and clay. Trying with solid pens tonight. Other than ink not fitting back in I love them! Now going to try to use these for something else…
I hope the solid pens work. I wish I could give a definitive guide as to which pens work and don’t mess up in oven!
I wish I had read the previous post! I used the clear BIC pens and mine melted and then cracked the clay (idk if the two errors were related)
Doesn't the pen melt?
Some pens melt – don't use Staples brand. They melted on me. I used the clear papermate Bic pens & they were fine. Don't cook them more than 10 min either.
Gorgeous and simple! Thank you for sharing. My daughter is making them at her 9th birthday party. She is so thrilled! She's planning to use them as gifts for her teachers, too!
great birthday party craft, the kids will love them!
I always wanted to learn how to use p.clay.
I love the pens, but is there anything easier?
I did these and I used Wal-mart stick ball point pens and Sculpey, it worked wonderfully i used a thin layer of clay on these and 5 minutes was enough to bake the clay without melting the pen. I wish I had a camera to post pictures of them. Thanks for the tutorial!
Glad it worked for you!
This technique is awesome!I love making polymer clay pens.Thx for sharing!:D
I couldn’t wait to try these! We got them made and they looked great…. Until we put them in the oven. We had two different brands, one was a staples brand (with white plastic shell) and the other was bic brand (clear plastic shell) . We checked them after a few minutes in the oven and the pens were melted. 🙁 Do you have any suggestions?? Thanks!
So sorry to hear your pens melted. I wish I could tell you exactly which brand of pen to use. The ones I used were freebies my husband has collected from hotels… they are all different
I usually always read comments before trying any pin. I regret that I didn’t and my Bic pens melted. Sad. I will try again in the future following the recommendations of the others. But, the first part was fun and easy nonetheless.
so sorry your pens melted…I would love to be able to nail down exactly the make and brand of pen that works for this project. I used free hotel give-away pens and who knows makes them!
I want to make a couple of these for mt mom, who uses those erasable ink pens forcher crossword puzzles. Do you think those pens would melt?
I wish I could say!
I am going to make handle for my crochet hooks
I’m thinking this is a great idea! I need to try this myself!
how can i make poka dots
I got a cheep hotel pen and I’m gonna try this ASAP! Do the pens dry out without the caps?
Could you do any other designs?
The design options are endless just by using different colored tiles!
I have never had a problem with the pens drying out!
This is such an easy and fun project! My second period teacher made one for all of her students and so I decided to go and make some of my own for Christmas! Thanks for sharing!
Glad you had fun with this project, it can get quite addictive!
I would love to cover my metal punch needle with a pen blank. Can it be done? Thanks.
Don’t see why not!
Have mine in the oven think I used the wrong pens will post a pic either way. Thanks a great easy to follow tutorial. My daughter who had DCD. Just loved it any thing to get her fingers moving.